In this tutorial you will learn:
- How to access the API documentation
- How to get your API key
- How to find your project token
- An example API tutorial on how you can use the API to build a Python and Flask app
1) Look at the API documentation
The API documentation is located here and has copies of code for curl, php, python, node and go.
To use the ParseHub API you will need:
- Your API key
- Your project token
Keep reading below to find these two values...
2) Find your API key
The API key is located under your account settings.
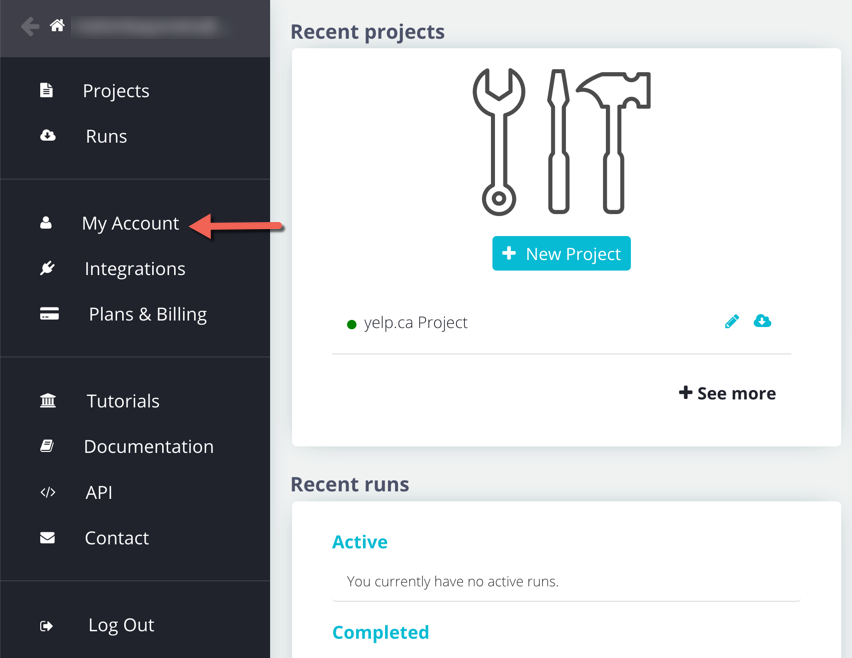
1. In the ParseHub desktop app, click on the "My Account" link in the ParseHub sidebar.

or
1. You can find it in your "Account" page on the website here - https://www.parsehub.com/account
3. Copy and paste the API key that you find on this screen
3) Find your project token
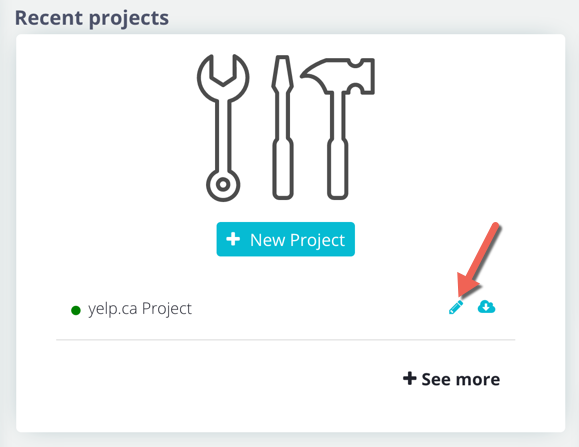
1. Open the project that you want to get data from using the API

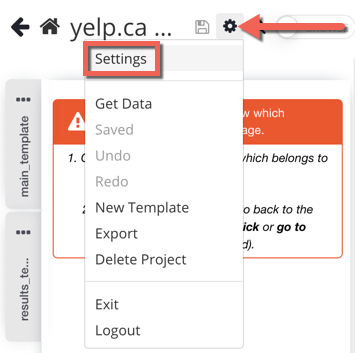
2. Open the options menu at the top of your project and then click on "Settings"

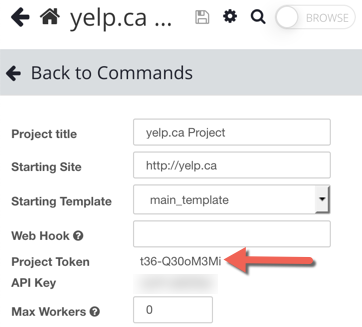
3. Copy and paste the project token from this page

4) Step by step API tutorial
This is a step-by-step tutorial for integrating ParseHub into your service via the API. We also have a complete API reference.
Python and Flask are used in all of the examples. Flask is a web framework, similar to Rails for Ruby or Express.js for Node. If you don't have Flask installed, you can install it by running the following command in your terminal:
sudo pip install FlaskWe'll create a directory to use for this tutorial.
mkdir /tmp/parsehub; cd /tmp/parsehubFor this tutorial, you need to login to the ParseHub client and create a project with ParseHub by following the dynamic filter tutorial. If you don't want to follow the tutorial, you can download the completed project here. Import it into your account, save it, and run it once to follow along.
In the Settings tab of the project, you'll find the project's token. You'll need to use this token in place of {PROJECT_TOKEN} in the examples.
Using the ParseHub API requires an API key for authentication. Your API key is shown here as {API_KEY}. You can get your actual API key from parsehub.com/account.
A simple example
The project above extracts a list of movies, optionally filtered by a keyword. Run the project from the ParseHub client. We'll make a page which lists the movies that were extracted. Create two files: movies.py and movies.html in your tutorial directory.
# movies.py

from flask import Flask, render_template
import requests
import json

app = Flask(__name__, template_folder='.')

@app.route('/')
def homepage():
  params = {
    'api_key': '{API_KEY}',
  }
  r = requests.get(
      'https://www.parsehub.com/api/v2/projects/{PROJECT_TOKEN}/last_ready_run/data',
      params=params)
  return render_template('movies.html', movies=json.loads(r.text)['movies'])

if __name__ == '__main__':
  app.run(host='0.0.0.0', debug=True)
<!-- movies.html -->

<html>
<body>
  <h1>Movies</h1>
  {% for movie in movies %}
    <div>{{movie["title"]}}</div>
  {% endfor %}
</body>
</html>
The homepage() function in movies.py is where most of the work happens. We fetch the data, and then render it using the template in movies.html.
The bulk of the homepage() function was copy-pasted from the API Reference. Don't forget to replace {PROJECT_TOKEN} with the token of your project. In the command line, type
python movies.pyNow visit http://localhost:5000 in your browser to see the movies from ParseHub on the website you made.
Adding caching
The above example will work, but there's a big drawback: every time a user visits your website, your server will fetch the data from ParseHub. This is bad for two reasons:
- The user experience is poor. Your server has to wait for a response from ParseHub before it can serve the page to the user.
- Your server is downloading a potentially large file on every request. That's a great way to waste your bandwidth!
The data doesn't update very often, so we can periodically fetch the data from ParseHub and store the results locally on our server. This will avoid the problems above. Add the following file to your directory:
# fetch.py

import requests
import os

params = {
  'api_key': '{API_KEY}',
}
r = requests.get(
    'https://www.parsehub.com/api/v2/projects/{PROJECT_TOKEN}/last_ready_run/data',
    params=params)

with open('/tmp/movies.tmp.json', 'w') as f:
  f.write(r.text)

os.rename('/tmp/movies.tmp.json', '/tmp/movies.json')
This file will fetch the latest json data for our project, and write it into /tmp/movies.json. We first write it to a temporary file, and then use os.rename at the end. This is to make sure the operation is atomic. If we didn't do that, we might be in the middle of writing the file when a request comes in, and the json data would be corrupt. In those cases, your web page would throw an error, resulting in a poor user experience.
Let's make sure it works correctly. In your terminal, run
python fetch.pyfollowed by
cat /tmp/movies.jsonThe result should be a json string that looks like
{"filter":"good","movies":[{"title":"The Good, the Bad and the Ugly","year":"1966"},{"title":"Goodfellas","year":"1990"}]}We'll use this script for a cron job so that the new results are fetched daily. In your terminal, type
crontab -eNow add a new line to your crontab that looks like this
0 0 * * * python /tmp/parsehub/fetch.pyThis will run fetch.py at midnight every day, to fetch the data. Let's update our web page to use the results from the local file instead of reading it.
# movies.py
# ...

@app.route('/')
def homepage():
  with open('/tmp/movies.json', 'r') as f:
    return render_template('movies.html', movies=json.loads(f.read())['movies'])

# ...
That's it! Of course, there are other caching techniques you can use. For example, you could load the file once and keep the data in memory, rather than loading the file for each request. However, those are outside the scope of this tutorial.
Running on a schedule
If you've followed the steps so far, our cron script is downloading the freshest results every day. But our project isn't run automatically, so the "freshest" results will be from the last time we manually ran it.
If you're on a paid account, you can easily set up a schedule for your project from within the ParseHub client. We can also use a cron job to set up a schedule.
# run.py

import json
import requests

params = {
  'api_key': '{API_KEY}',
  'start_value_override': json.dumps({'filter': 'night'}),
}
r = requests.post(
    'https://www.parsehub.com/api/v2/projects/{PROJECT_TOKEN}/run',
    data=params)
This will kick off a run of the project. Note the use of start_value_override in the parameters. This can be any json value. It will be passed to your project, and your project can use it to change what it does. In our case, it will only extract data about movies containing the string night.
You might be asking, "why not get all the data and filter it at the end?". In this toy example, you can certainly do that. But passing the filter into the project allows it to drastically reduce the number of pages it needs to visit. In this case, our project will not visit the detail page for any movie that is filtered out.
Like before, let's set up a cron job for this script. Type
crontab -einto your terminal, and add the line:
0 23 * * * python /tmp/parsehub/run.pyThis will run run.py at 11PM daily. Note that we kick off the run at 11PM and fetch the results at 12AM. This gives ParseHub plenty of margin to finish the job.
Using Webhooks
In our case, we have a very small project and are confident that it will finish quickly. However, sometimes you don't know how many pages will need to be traversed, or the number may be different depending on your input parameters. Even when you know it's a small amount, your run may be queued up for a while if you try to run many projects at once.
In all cases, the best practice for waiting for a run to complete is to use webhooks. Setting up a webhook lets ParseHub tell your service when a run is finished, instead of you having to periodically check. Not only that, but ParseHub will alert your service whenever the run's status changes (e.g. an error occurs).
To use webhooks, you'll need a server with a publicly visible IP address. You can get a cheap, $0.007/hour server on DigitalOcean if you don't already have one.
Copy all the files you have so far onto the server. Now add another endpoint to your movies.py:
# movies.py

import os
from flask import request

# ...

@app.route('/parsehub_callback', methods=['POST'])
def parsehub_callback():
  if int(request.form['data_ready']):
    params = {
      'api_key': '{API_KEY}',
    }
    r = requests.get(
        'https://www.parsehub.com/api/v2/runs/%s/data' % request.form['run_token'],
        params=params)

    with open('/tmp/movies.tmp.json', 'w') as f:
      f.write(r.text)

    os.rename('/tmp/movies.tmp.json', '/tmp/movies.json')
  return 'received'

# ...
Don't forget to add the import at the top. This callback does exactly what fetch.py previously did: it will save the freshest data locally. Let's add this webhook to our project. Open the project and go to the "Settings" tab. In the "webhook" textbox, type http://{PUBLIC_IP_ADDRESS}:5000/parsehub_callback. Replace {PUBLIC_IP_ADDRESS} with the IP address of your server.
Now ParseHub will call this handler every time the status of a run changes. It doesn't matter how long the run takes, or if it's queued up on our servers for a while. It'll just work.
If you now try to point your browser to http://{PUBLIC_IP_ADDRESS}:5000, you'll get an error, because the local movies file is not populated yet. Run the project from the ParseHub client, and refresh the page once it finishes. The movies should appear.
That's it for this tutorial. If you have any feedback on how we could improve it, get in touch here
